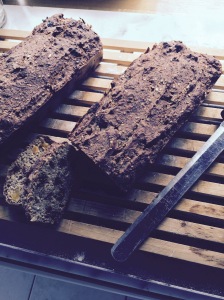
Phyto fruit loaf

As I have already said, my mum’s on a health quest, and she is also tackling menopause at the same time (FUN) so she has found this diet where you need to eat lots of phyto products as this evens out the estrogen and eases menopausal symptoms or something like that.

IMG_0853 IMG_0854

I’m not denying that at first it may look slightly gross, but it’s actually delicious!

Anyway this recipe makes a surprisingly delicious and healthy spiced fruit loaf that is also vegan and wheat free!

DON’T KNOCK IT TILL YOU TRY IT!

FullSizeRender

INGREDIENTS:

  • 140g soya flour
  • 100g buckwheat flour
  • 100g flaxseeds
  • 50g sesame seeds
  • 50g sunflower seeds
  • 280g dried fruit ( I like a combination of apricots and raisins)
  • 2 tbsp caster sugar
  • 1 tsp nutmeg
  • 1 tsp mixed spice
  • 1 tsp ground cinnamon
  • 1 tsp ground ginger
  • 2 tsp wheat free baking powder
  • 800 ml soya milk

METHOD:

  1. Mix all the dry inredients together in a large bowl
  2. Tip over the soya milk
  3. leave for 1 hour to soak
  4. while it is soaking, preheat the oven to 175C
  5. After 1 hour, spoon into two prepared loaf tins and bake in the oven for 60-90 minutes until firm on top and a skewer comes out clean.
  6. Serve warm or cold with butter, cheese or fruit/nut spread (It is definitely best with jam!)

Thai Green chicken curry

Time for an Asian splash on my food blog, thai green chicken curry! Delicious!

IMG_0831 IMG_0830

Creamy, aromatic, and not too spicy- of course, if you like it hot, add chillis!

IMG_0832

as you can see, we really enjoyed it at my house! almost all gone within minutes of being cooked!

So quick to whip up, it takes 20 minutes tops, and is so yummy, you’ll feel the culinary prowess rise inside of you!

INGREDIENTS:

  • 2 tablespoons wok oil
  • 3 tablespoons finely chopped spring onions
  • 3 – 4 tablespoons green thai curry paste
  • 1 kilogram chicken thigh fillets (cut into strips about 4 x 2cm / 1½ x ¾ inches)
  • 1 x 400 ml can coconut milk
  • 250 ml chicken stock
  • 1 tablespoon thai fish sauce 
  • 150 grams frozen fine green beans- or you can use fresh
  • 3 tablespoons chopped coriander, to sprinkle over when serving
  • cooked rice or noodles to serve

METHOD:

  1. Heat the wok oil in a large saucepan that owns a lid, drop in the spring onions and cook, stirring for a minute or two, then add the curry paste.
  2. Add the chicken pieces and keep turning over heat for 2 minutes, before adding the coconut milk, stock and fish sauce.
  3. Simmer for 10 minutes, then add the frozen fine beans to the mix and cook for another 3-5 minutes. (if using fresh beans, cook according to packet, about 6 minutes usually, then add and simmer for another 3 minutes)
  4. Serve with rice or noodles, sprinkling the coriander over as you do so.

Also, it’s nice to have lime wedges to squeeze over when you eat it!

chocolate orange sweet bread twist ring

So this week’s yummy concoction calls for…. SWEET BREAD!!

IMG_0829

I absolutely love making bread, there’s nothing like hand kneading it then watching it grow, makes me so proud!

I decided to make it with chocolate chips and orange extract- a jaffa-inspired treat!

IMG_0823 IMG_0824 IMG_0826 IMG_0827

When i make it, I glaze it with an egg wash, but you could also do it with sherry, for an extra kick! Some people think that milk and egg washes are interchangeable but this isn’t true because an egg wash causes a nice shine and golden colour where as a milk wash encourages browning, so is better for things such as scones, which would otherwise remain a very pale colour.

IMG_0820 IMG_0822

Its really handy that I have a double oven, because it means I can turn one on and the other one gets warm but not hot, the perfect temperature for rising bread!

INGREDIENTS:

  • 250g Strong white bread flour 
  • 25g golden caster sugar 
  • 7g active dried yeast
  • 50g Butter, melted
  • 1tsp Orange extract 
  • 100g Dark chocolate chips
  • 1 egg for glaze, or 2tbsp of sherry

METHOD:

  1. put the flour in a glass bowl and stir through the sugar, then the yeast, and then 1 tsp of salt, making sure to mix them through separately as the salt can kill the yeast if it comes into close contact with it.
  2. mix in the melted butter with a palette knife and then gradually add in 150ml of WARM water, but you may not need all of it.
  3. Bring together into a ball of soft dough, then tip onto a lightly floured surface and knead for 10-15 minutes until stretchy and silky.
  4. place into a lightly oiled bowl and cover with cling film, then leave in a warm place to rise for 1-2 hours.
  5. meanwhile mix the chocolate and orange together.
  6. When risen, roll the dough out onto a surface about 35cm x 25cm rectangle, and then sprinkle the chocolate chip mixture over the dough.
  7. With the longest side towards you, roll into a tight spiral, and then cut the spiral in two almost all the way to the end, as if to form a pair of legs. Twist the two legs together and join the ends to form a round spiral.
  8. Put on a lined baking tray and cover with a tea towel, then leave again to rise in a warm place for another hour.
  9. Meanwhile, preheat the oven to 200C.
  10. When the bread has risen a second time, brush with the whisked egg or sherry, sprinkle a little caster sugar over, and bake in the oven for 10-15 minutes, then take the bread out and cover with tin foil, then cook for another 10-15 minutes.
  11. ENJOY

Vegan lentil lasagne

Like I said, my  mum is on a quest to lose weight, but she is also on a quest to beat menopause, and to do this she has been set on a strict diet that will include lots of soya and no wheat etc., meaning that tasty meals can be hard to come by.

LEXI TO THE RESCUE!

this lasagne is completely meat, wheat, and dairy product free!

IMG_0806 IMG_0807

The pasta sheets are wheat free and instead of milk and butter for the white sauce it is just soya milk and blended cauliflower- a lot tastier than it sounds, i promise!

IMG_0805

Also, everyone should definitely get a garlic crusher like this, they’re soooooooo good!! just shove the peeled clove in and twist. Easy peasy.

IMG_0808 IMG_0810

INGREDIENTS:

  • 1 tbsp olive oil
  • 1 onion, chopped
  • 1 carrot, chopped
  • 1 celery stick, chopped
  • 1 garlic clove, crushed
  • 1 courgette, chopped
  • 2 x 400g cans lentils, drained, rinsed- dried lentils can also be used, just cook according to instructions, and then add
  • 1 tbsp cornflour
  • 400g can chopped tomatoes
  • 1 tsp mushroom ketchup
  • 1 tsp chopped oregano (or 1 tsp dried)
  • 1 tsp vegetable stock powder
  • 2 cauliflower heads, broken into florets
  • 2 tbsp unsweetened soya milk
  • pinch of freshly grated nutmeg
  • wheat-free (or normal) lasagne sheets

METHOD:

  1. Heat the oil in a pan, add the onion, carrot and celery, and gently cook for 10 mins or until soft. Add the garlic and courgette, cook for a few mins, then stir in the lentils and cornflour.
  2. Add the tomatoes plus 2 thirds of a can of water, the mushroom ketchup, oregano, stock powder and some seasoning. Simmer for 15 mins, stirring occasionally.
  3. Meanwhile, cook the cauliflower in a pan of boiling water for 10 mins or until tender. Drain, then purée with the soya milk using a hand blender or food processor. Season well and add the nutmeg.
  4. Heat oven to 180C/160C fan/gas 4. Spread a third of the lentil mixture over the base of a ceramic baking dish. Cover with a single layer of lasagne, snapping the sheets to fit. Add another third of the lentil mixture, then spread a third of the cauliflower purée on top, followed by a layer of pasta. Top with the last third of lentils and lasagna, followed by the remaining purée.
  5. Cover loosely with foil and bake for 35-45 mins, removing the foil for the final 10 mins of cooking.

Skinny blueberry cinnamon muffins

My mum has been on a diet for as long as I can remember, so has asked me if I could please stop baking tempting treats, but of course I told her this is an outrage! I can’t possibly stop baking, so for her, I am making a lower calorie ‘skinny’ blueberry muffin so she can enjoy a treat but still try and lose weight.

IMG_0791 IMG_0792

I love that the batter goes a really nice purply colour with the blueberries in it! If you want to substitute the blueberries for a different type of berry, that would work as well and taste just as scrummy!

Each muffin contains 170 calories, if you make 12 with the recipe, and if you are doing the slimming world diet, each one has 8.5 syns on the extra easy diet 🙂

FullSizeRender

INGREDIENTS:

  • 250g Self-raising white flour 
  • 1½tsp Baking powder
  • 50g Margarine low fat
  • 75g caster sugar
  • 2 tsp cinnamon
  • 100g Blueberries (fresh or frozen)
  • 2 large eggs
  • 235ml skimmed milk 
  • Lemon juice from half a lemon

METHOD:

  1. Preheat the oven to 180C
  2. Sieve flour, baking powder and cinnamon into a large bowl, then rub in mragarine until well combined and resembling breadcrumbs
  3. Stir in the sugar
  4. In a seperate jug, whisk together the milk, eggs and lemon juice, and then stir into the flour mixture
  5. Fold in the blueberries, being careful not to crush them
  6. bake in the oven for 20-25 minutes until golden brown

Also, before baking you could sprinkle a spoonful of oats over each muffin for extra tastiness!

Chocolate drizzled golden syrup flapjacks

Baking again, of course, and this time I decided to make the simple classic; the flapjack. Sweet chewy and absolutely delicious! I love how easy this recipe is, and how quick it is to make! I was working this afternoon at the kennels walking dogs, and I just whipped these up when I got home, super simple.

IMG_0776

I just made plain ones this time, but you could include whatever extras you like, such as dried fruit (raisins, apricots, glace cherries etc), nuts, coconut, chocolate chips, marshmallows, The possibilities are endless!

IMG_0778IMG_0777

I love to finish mine with a drizzle of chocolate, as it just makes them look that extra bit more special!

INGREDIENTS:

  • 250g Porridge Oats
  • 125g Butter
  • 125g Brown Sugar
  • 2-3 tbsps Golden Syrup (depends how gooey you want it)
  • 50g chcocolate, melted for drizzling

METHOD:

  1. Preheat the oven to 180c
  2. Melt the butter in a pan with the sugar and golden syrup
  3. Add the oats and stir until well combined (if you want to add any extras like I suggested, do it now!)
  4. tip into a lined baking tin and squish evenly down
  5. Bake for 15-20 minutes until golden, then take out and leave to cool
  6. When they have completely cooled, drizzle the melted chocolate over and leave to set
  7. Cut into pieces and enjoy!!

IMG_0780

Chocolate chip fudge chunk cookies

It’s my friend Isaac’s birthday soon so I promised him I would make him my favourite cookies for it, and this is the result!

IMG_0757IMG_0759

In the recipe I use half light brown sugar and half caster sugar, because it gives a really great texture, (and a yummy flavour!) but i have used half muscovado and half granulated sugar before, and this works well also, so if you only have these sugars in your cupboard, use them instead!

IMG_0754

I love these chocolate chips! Massive bag that lasts for ageeeeees

IMG_0756

If you don’t have a silicon baking mat, you should definitely get one! they are so useful, and it saves flaffing about with greasing etc.

IMG_0753

Also, if you make these, try to do it just before you have guests; it makes the house smell AMAZING!

INGREDIENTS:

  • 150g salted butter, softened
  • 80g light brown sugar
  • 80g caster sugar
  • 2 tsp vanilla extract
  • 1 large egg
  • 225g plain flour
  • ½ tsp bicarbonate of soda
  • 100g plain chocolate chips or chunks
  • 100g fudge chunks

METHOD:

  1. Preheat the oven to 190C/170C fan/gas 5. Line two baking trays with non-stick baking paper (or a very handy silicon mat)
  2. Put the butter and sugars into a bowl and beat until creamy. Beat in the vanilla extract and egg. Sieve the flour and bicarbonate of soda over the mixture and mix in with a wooden spoon. Add the chocolate chips and fudge chunks and stir well.
  3. Using a teaspoon, place small mounds of the mixture well apart on the baking trays. Bake in the oven for 8–10 mins until light brown on the edges and still slightly soft in the centre.
  4. Leave on the tray for a couple of minutes to firm up and then transfer to a cooling rack.

TIP: best eaten warm and served with icecream! YUM!

Berry chocolate swirl cake

So my grandparents have a better social life than I do to be honest, so every time we go round, I always make sure to stock them up with baked goods for them to feed their guests that they are bound to have. This weekend, I decided to go for a chocolate berry swirl cake, which they thought was absolutely delicious!

berry swirl cake 2

Who doesn’t love chocolate and vanilla cake, swirled together with blueberries, raspberries, and chunks of white and milk chocolate!? If you don’t, then you’re crazy.

If you want to use different berries, then feel free, but I think raspberries and blueberries are the best!

berry swirl cake 3

Berry Chocolate Swirl Cake

INGREDIENTS:

  • 175g self-raising flour
  • ½ tsp baking powder
  • 175g caster sugar
  • 175g butter, at room temp
  • 3 organic free-range eggs, beaten
  • 2-3tbsp milk
  • 100g white chocolate, cut into chunks (or use chocolate chips)
  • 75g raspberries, defrosted if frozen
  • 75g blueberries, defrosted if frozen
  • 2tbsp cocoa powder
  • 100g milk chocolate, cut into chunks (or use chocolate chips)

METHOD:

  1. Heat oven to 180°C (gas mark 4). Grease and line a 20cm square baking tin (usually I don’t bother greasing it, it doesn’t make much difference!)
  2. Sieve flour and baking powder into a bowl, and stir in caster sugar. Add butter and eggs, and beat together using an electric whisk until the mix is light and falls from the beaters -you may need to add 2-3 tbsp milk to get the right consistency.
  3. Spoon half the mix into another bowl and add the white chocolate and berries; mix until the berries begin to break, then set aside. Sift the cocoa powder into the remaining plain mixture, then fold in the dark chocolate chunks.
  4. Spoon the mixtures into the prepared tin, alternating colours. Drag a fork or skewer through the mix to marble the colours,
  5. Bake for 20-25 mins or until a skewer inserted into the middle comes out clean. Leave to cool slightly, remove from the tin and slice into portions.

It’s great served warm with ice cream or lightly whipped cream! YUM!

Double Chocolate cheesecake

A while back my family came over for dinner, and whenever that happens, as often does, the responsibility always falls on me to make a delicious concoction of ingredients for dessert! We had an Australian with us, and her absolute favourite was cheesecake, so I figured I better cater for our friend from down under!

This resulted in me getting out my favourite recipe for chocolate baked cheesecake, covered with a whipped cream marbled with chocolate sauce and finished with grated chocolate! YUM. Hope you enjoy making it 🙂

chocolate cheesecake

INGREDIENTS: 

(for the base)

  • 85g hot melted butter
  • 14 plain chocolate digestives, finely crushed

(for the cheesecake)

  • 3 x 300g packs full-fat Philadelphia cheese
  • 200g golden caster sugar
  • 4 tbsp cocoa, sifted
  • 2 tsp vanilla extract
  • 3 tbsp Tia Maria
  • 3 large eggs
  • 284ml pot soured cream
  • 100g bar dark chocolate, melted (i always use carte dor that i bring back from my grandma’s in Belgium, but whatever you prefer is fine!)
  • 2-3 tbsp milk
  • 284ml pot double cream
  • grated chocolate, to decorate

METHOD:

  1. Heat oven to 180C/fan 160C/gas 4. Line the base of a 25cm springform tin with baking parchment. Mix the melted butter and biscuit crumbs until well blended, then press firmly onto the base of the tin. Bake for 10 mins.
  2. Turn oven temperature up to 240C/fan 220C/gas 9. Beat the cream cheese (make sure it is at room temp.) and sugar with an electric whisk until smooth and creamy, then whisk in the cocoa, vanilla, Tia Maria, eggs, soured cream and half the melted chocolate. Stir enough milk into the remaining chocolate to make a sauce consistency, then set aside until ready to decorate the cheesecake.
  3. Pour in the cheese mixture, then smooth the top. Bake for 10 mins, then turn the heat down to 110C/fan 90C/gas ¼ for 25-30 mins. The filling should be set, but with a wobble in the centre. Turn off the oven, open the door a crack, then leave the cheesecake to cool in the oven for 2 hrs. Chill until ready to serve. (if the cheescake cracks, don’t worry, this almost always happens to me. That’s what I love about this recipe, you can hide it with loads of cream on top!)
  4. To decorate the cheesecake, carefully remove it from the tin and strip the lining paper from the base. Lightly whip the cream until it just holds its shape, then swirl it on top and drizzle with the reserved chocolate sauce, rippling the sauce through the cream with the end of a spoon. Sprinkle over the grated chocolate, and then serve, and impress all of your dinner guests!

Lets Bake!

Hi! It’s just me, Lex, lover of baking, cooking, and all things food really. Recently I was told it would e good to get another hobby, so I figured what better to do than share my love of baking with the world! My sister keeps going on that I should have a career in it, so I hope you like it. Enjoy!

Blog at WordPress.com.

Up ↑